设置 Crons
Sentry Crons 允许您监控应用程序中任何计划的、重复任务的正常运行时间和性能。
一旦实现,它将允许您获取警报和指标,以帮助您解决错误、检测超时并防止服务中断。
- Use our getting started guide to install and configure the Sentry SDK (version
7.51.1or newer) for your recurring job. - Create and configure your first Monitor.
如果您使用 cron、node-cron 或 node-schedule 库来运行您的周期性任务,您可以使用 Sentry.cron 导出中的 instrumentation 函数来监控您的 cron 任务。
需要 SDK 版本 7.92.0 或更高版本。
使用 Sentry.cron.instrumentCron 来 instrument cron 库中的 CronJob 构造函数或 CronJob.from 方法。将 cron 监控的名称作为第二个参数传递给该函数。
import { CronJob } from "cron";

const CronJobWithCheckIn = Sentry.cron.instrumentCron(CronJob, "my-cron-job");

// use the constructor
const job = new CronJobWithCheckIn("* * * * *", () => {
  console.log("You will see this message every minute");
});

// or from method
const job = CronJobWithCheckIn.from({
  cronTime: "* * * * *",
  onTick: () => {
    console.log("You will see this message every minute");
  },
});
需要 SDK 版本 7.92.0 或更高版本。
使用 Sentry.cron.instrumentNodeCron 来 instrument node-cron 库中的 cron 导出。这将返回一个与原始 cron 导出具有相同 API 的对象,但其 schedule 方法已被 instrumented。您可以在函数的第三个选项参数中传递 cron 监控的名称和可选的时区。
import cron from "node-cron";

const cronWithCheckIn = Sentry.cron.instrumentNodeCron(cron);

cronWithCheckIn.schedule(
  "* * * * *",
  () => {
    console.log("running a task every minute");
  },
  { name: "my-cron-job" }
);
需要 SDK 版本 7.93.0 或更高版本。
使用 Sentry.cron.instrumentNodeSchedule 来 instrument node-schedule 库中的 schedule 导出。这将返回一个与原始 schedule 导出具有相同 API 的对象,但其 scheduleJob 方法已被 instrumented。您可以在函数的第一个参数中传递 cron 任务的名称。目前,这仅支持在 scheduleJob 的第二个参数中使用 cron 表达式(cronstring)。
import * as schedule from "node-schedule";

const scheduleWithCheckIn = Sentry.cron.instrumentNodeSchedule(schedule);

scheduleWithCheckIn.scheduleJob(
  "my-cron-job",
  "* * * * *",
  () => {
    console.log("running a task every minute");
  }
);
使用 Sentry.withMonitor() API 来监控回调函数,并在以下情况下通知您:如果您的周期性任务被错过(或未按预期启动),如果由于运行时问题(如错误)导致任务失败,或者如果任务因超过最大运行时间而失败。
Sentry.withMonitor() 需要 SDK 版本 7.76.0。
Sentry.withMonitor("<monitor-slug>", () => {
  // Execute your scheduled task here...
});
如果您使用的是早于 7.76.0 的 SDK 版本,您可以使用下面文档中的 Sentry.captureCheckIn() API。
签到监控允许您通过完成两个签到来跟踪任务的进度:一个在任务开始时,另一个在任务结束时。这个两步过程使 Sentry 可以在任务未按预期启动(错过)或超过最大运行时间(失败)时通知您。
// 🟡 Notify Sentry your job is running:
const checkInId = Sentry.captureCheckIn({
  monitorSlug: "<monitor-slug>",
  status: "in_progress",
});

// Execute your scheduled task here...

// 🟢 Notify Sentry your job has completed successfully:
Sentry.captureCheckIn({
  // Make sure this variable is named `checkInId`
  checkInId,
  monitorSlug: "<monitor-slug>",
  status: "ok",
});
如果您的任务执行失败,您可以通知 Sentry 关于该失败:
// 🔴 Notify Sentry your job has failed:
Sentry.captureCheckIn({
  // Make sure this variable is named `checkInId`
  checkInId,
  monitorSlug: "<monitor-slug>",
  status: "error",
});
心跳监控通过一个签到通知 Sentry 任务的状态。此设置仅会在任务未按预期启动(错过)时通知您。如果您需要跟踪任务以查看其是否超过最大运行时间(失败),请使用签到。
// Execute your scheduled task...

// 🟢 Notify Sentry your job completed successfully:
Sentry.captureCheckIn({
  monitorSlug: "<monitor-slug>",
  status: "ok",
});
如果您的任务执行失败,您可以:
// 🔴 Notify Sentry your job has failed:
Sentry.captureCheckIn({
  monitorSlug: "<monitor-slug>",
  status: "error",
});
您可以使用代码而不是在 Sentry.io 中创建和配置它们 来创建和更新您的监控。
要创建或更新监控,请使用 Sentry.withMonitor() 并将监控配置作为第三个参数传递:
const monitorConfig = {
  schedule: {
    type: "crontab",
    value: "* * * * *",
  },
  checkinMargin: 2, // In minutes. Optional.
  maxRuntime: 10, // In minutes. Optional.
  timezone: "America/Los_Angeles", // Optional.
};

Sentry.withMonitor(
  "<monitor-slug>",
  () => {
    // Execute your scheduled task here...
  },
  monitorConfig,
);
要配置监控的签到,请使用 Sentry.captureCheckIn() 并将监控配置作为第二个参数传递:
const monitorConfig = {
  schedule: {
    type: "crontab",
    value: "* * * * *",
  },
  checkinMargin: 2, // In minutes. Optional.
  maxRuntime: 10, // In minutes. Optional.
  timezone: "America/Los_Angeles", // Optional.
};

// 🟡 Notify Sentry your job is running:
const checkInId = Sentry.captureCheckIn(
  {
    monitorSlug: "<monitor-slug>",
    status: "in_progress",
  },
  monitorConfig,
);

// Execute your scheduled task here...

// 🟢 Notify Sentry your job has completed successfully:
Sentry.captureCheckIn(
  {
    // Make sure this variable is named `checkInId`
    checkInId,
    monitorSlug: "<monitor-slug>",
    status: "ok",
  },
  monitorConfig,
);
以下是可以使用的监控配置属性:
schedule:
任务的调度:
监控的调度表示形式,可以是 crontab 或 interval。结构将根据类型有所不同:
{"type": "crontab", "value": "0 * * * *"}
{"type": "interval", "value": "2", "unit": "hour"}
checkinMargin:
Sentry 等待签到的时间(以分钟为单位),超过此时间则认为签到已错过(“宽限期”)。可选。
我们建议您的签到宽限期小于或等于您的间隔时间。
maxRuntime:
任务允许运行的时间(以分钟为单位),超过此时间则认为任务失败。可选。
timezone:
任务运行的时区。这通常是您的服务器时区(例如 America/Los_Angeles)。请参阅 tz 数据库时区列表。可选。
node-cron 允许您传递 luxon 时区,但在使用 Sentry 时必须将其转换为 IANA 时区(例如,使用 DateTime.local().zoneName)。
failureIssueThreshold:
需要 SDK 版本 8.7.0 或更高版本
创建问题所需的连续失败签到次数。可选。
recoveryThreshold:
需要 SDK 版本 8.7.0 或更高版本
问题被视为已解决所需的连续成功签到次数。可选。
当您的定期任务未能签到(错过)、运行时间超过配置的最大运行时间(失败)或手动报告失败时,Sentry 将为您的监控创建一个带有标签的错误事件。
要接收这些事件的警报:
- 在侧边栏中导航到 警报。
- 创建一个新警报并选择“错误”下的“Issues”作为警报类型。
- 配置您的警报并定义一个过滤器匹配项:
事件的标签匹配 {key} {match} {value}。
示例:事件的标签匹配 monitor.slug 等于 my-monitor-slug-here
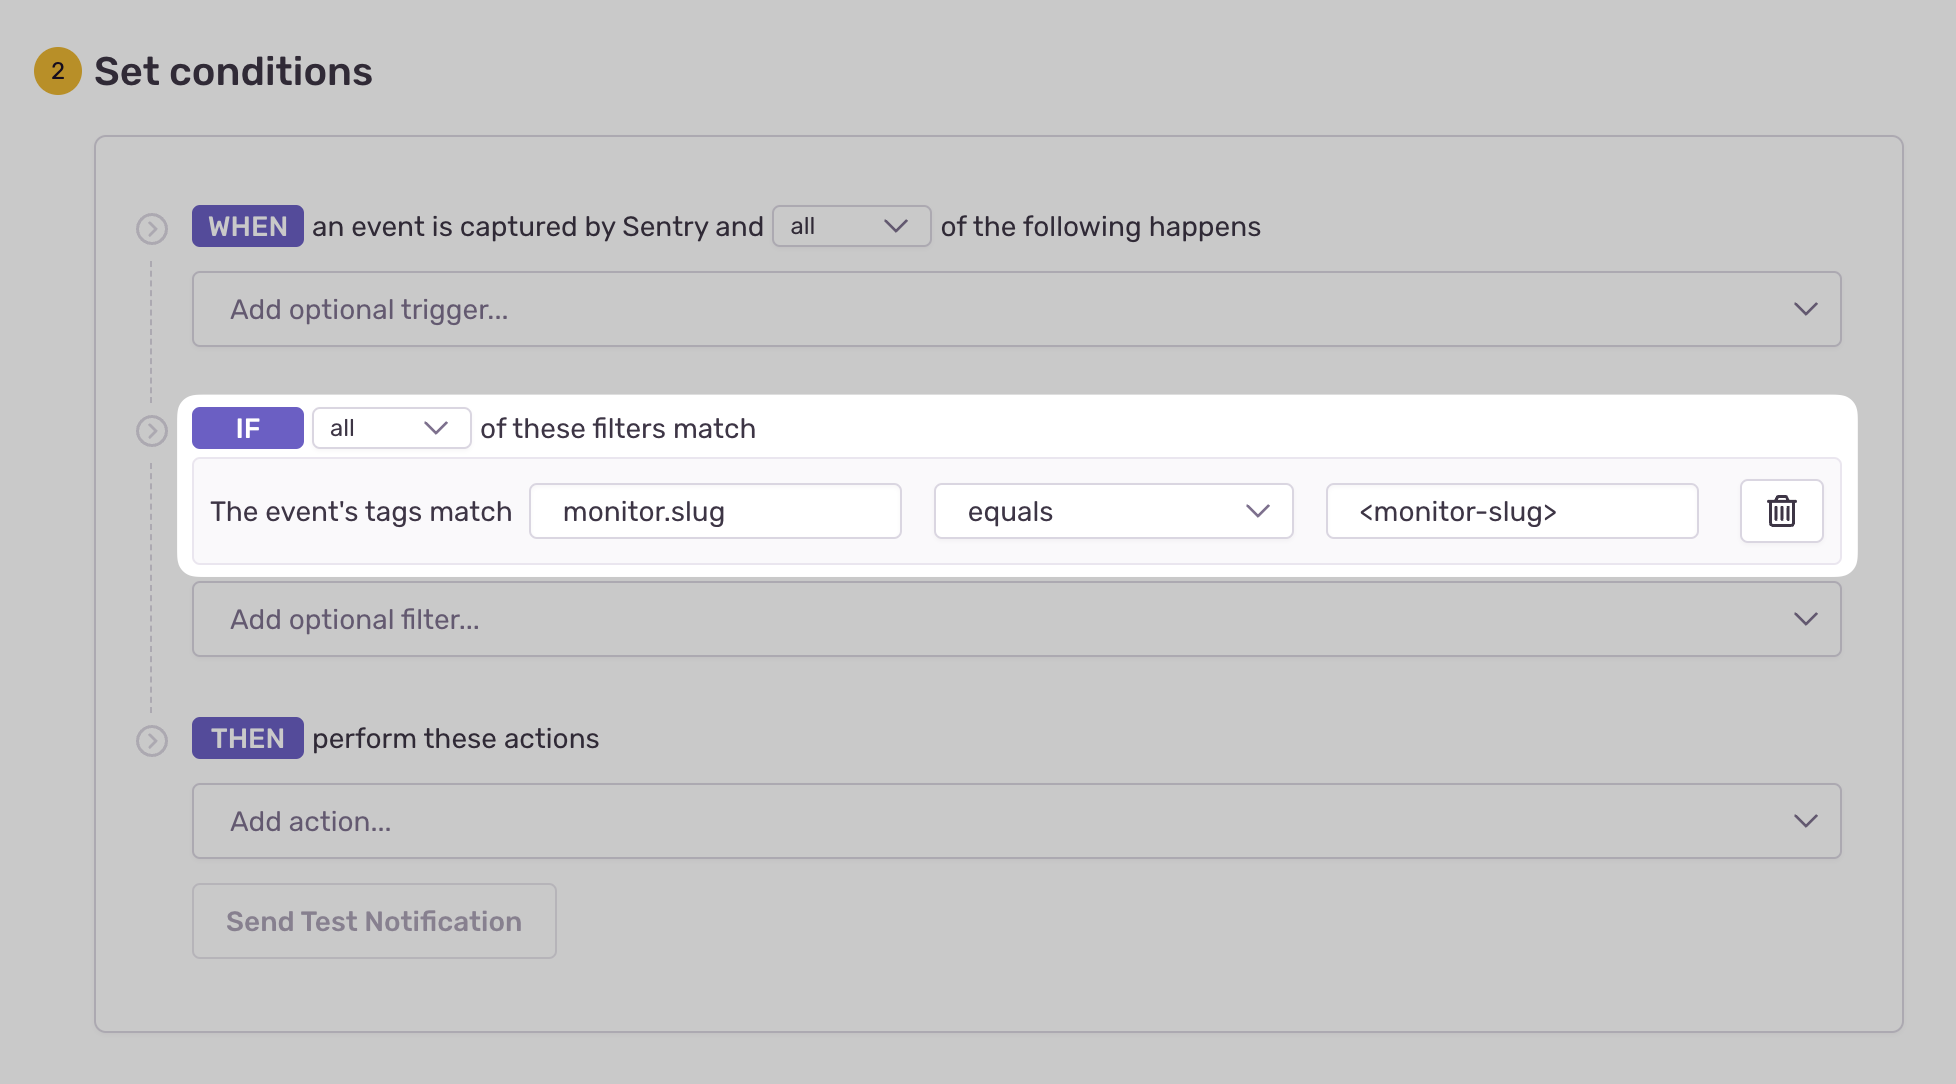
了解更多内容,请参阅 问题警报配置。
Crons 对签到实施速率限制以防止滥用和资源过度使用。具体来说,每个现有监控环境每分钟最多只能发送 6 个签到。此限制按项目强制执行,意味着该速率限制适用于给定项目中的所有监控环境。您可以在 Usage Stats 页面检查是否有任何签到被丢弃。
为了避免签到被丢弃,重要的是要高效地管理和分配签到,使其在速率限制内。这将有助于保持准确的监控,并确保所有关键